
WordPress is a free web software that can be used to build anything from a personal blog to a professional website (some notable users include BBC America and People Magazine) and everything in between. One of the fantastic things about it aside from being completely free to use (unless you choose to purchase a theme or plugin from a developer which isn’t necessary) is that it’s developed by and for a community and is so widely used that almost any question you have about it has already been answered and is just a quick Google away.
There are two types of WordPress sites: those developed on WordPress.com that include their own hosting, but have drawbacks such as not being able to advertise on your site and being limited in your customization. The other type are sites developed on the WordPress software, which requires a hosting provider and anywhere from a small to moderate amount of technical knowledge to install. This type allows full customization for both novice and advanced users and is the type that will be used in this example.
The main steps to set up a WordPress site are to:
- Find a host and domain
- Install WordPress
- Log In to WordPress
- Install a theme
- Create your content
So let’s get started! This process takes about an hour (up to 24 hours total depending on how quickly your hosting account sets up WordPress and your database for you) and you will need: A domain and a hosting account with an available database (available through ShowTimeDomains, GoDaddy or the like) set up for the domain you’re using.
1. Find a Host and Domain
There are hundreds of domain registrars and hosting providers out there to register a domain with and host (provide storage space on the web) your new site. Hosts include GoDaddy, HostGator, and DreamHost, among many others.
When it comes to picking a domain, a good rule of thumb is to pick short, but relevant and memorable. If you wouldn’t be able to remember it if you heard it on the radio, you can’t expect someone you’re talking to to remember it after you tell them about your great new site! Sure, MaryAnnsSuperAmazingLifeCoachingPractice.com is relevant, but nobody wants to remember that, let alone type it all out! A better option would be LifeCoachingByMaryAnn.com or even just your first and last name if this will remain just a single person sort of venture.
Things to keep in mind:
- Stay away from anything that isn’t .com, .net or .org. Sure, you may be able to pick up GreatLifeCoach.biz, but a .biz domain doesn’t lend as much credibility as a .com does
- You don’t need every extension from here to Timbuktu: just the .com, .net or .org for now will be sufficient until you get the ball rolling.
- Your domain is something you’re going to be giving out to people and asking them to type in themselves; make sure everything is spelled correctly!
Once you have your domain picked out, it’s time to pick up a hosting account. For performance reasons, a Linux-based server is recommended. Most major web hosting companies have their own ‘one-click’ install for WordPress, including our example using GoDaddy Web Hosting.
Getting technicfal for a moment: Why Linux? PHP (the coding language that WordPress heavily relies upon) runs more efficiently and with more stability on a Linux server because of how Windows servers are designed to handle PHP code. On a Windows server, PHP is considered secondary to ASP (another type of coding language) whereas PHP is the primary coding language on Linux servers.
Once you’ve picked out your host, purchase the hosting account that’s right for you and set it up to use the domain that you’re going to set up your site on. On GoDaddy, if you will only be hosting a single site and don’t have any plans to add another website to your account in the near future, the cheapest plan available (Economy Hosting) will do just fine. There is no major benefit to purchasing a Deluxe or Unlimited plan if you only have the one site planned.
2. Install WordPress
Please note: If you’ve elected to use a host other than GoDaddy or one of its resellers, your steps will be different from those shown here.
Your best option will be to head to your hosting provider’s support website and search for “WordPress” to see what articles they have and the best way to install on their servers.

To install WordPress on a GoDaddy Hosting Account, navigate to the Hosting Control Center and log in with your username and password.
This will take you either directly to the Hosting Details screen or if you have more than one hosting account, it will ask you which you want to work on.
In the middle of the page there is a menu that says “Options and Settings”. If there’s nothing under it, click on the grey plus sign to the left of it, otherwise directly underneath there’s a section called
“Popular Apps” with WordPress and its logo as an option to click on.
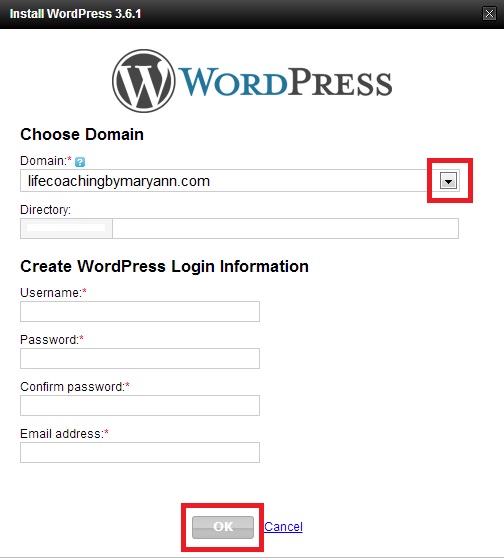
This will open up GoDaddy’s simplified version of WordPress installation. From the drop-down menu under “Domains”, select the domain you’re intending to use. If your domain doesn’t appear,
then your domain hasn’t fully set up on the hosting account yet. If it’s been more than 24 hours since you tried to set up your domain and it still isn’t appearing, call support.
This screen will also ask you for a directory if you want to put one in. This will put your website into a folder, so if you were to put “blog” into the directory box,
the address to get to your website would be lifecoachingbymaryann.com/blog. Leave it blank for it to show up on your main domain! (Recommended)
Once you have all of the boxes filled in and met the password requirements, the grey OK button in the image will light up green and you’ll be able to continue.
If it remains grey, double check that your password meets their requirements of starting with a letter, being between 7-15 characters and containing an uppercase letter,
a lowercase letter and a number.
These log in credentials will be how you log in to your site, so pick something secure!
It normally takes anywhere from fifteen minutes to a few hours for WordPress to install on a hosting account,
so GoDaddy will send an email to you once installation has completed so you can go ahead and access your site.
3. Log In to WordPress
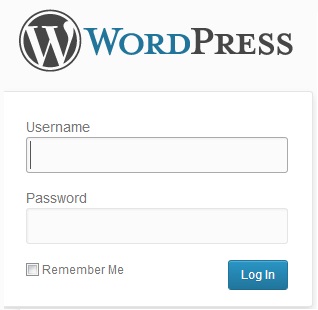
To log in to your website, navigate to http://YOURDOMAIN.com/wp-admin (replace YOURDOMAIN.com with your actual domain, of course) and put in your username and password that you created when you installed WordPress. This will bring you to the dashboard where you’ll see a Get Started area with some helpful links to review about using WordPress.
4. Install a Theme
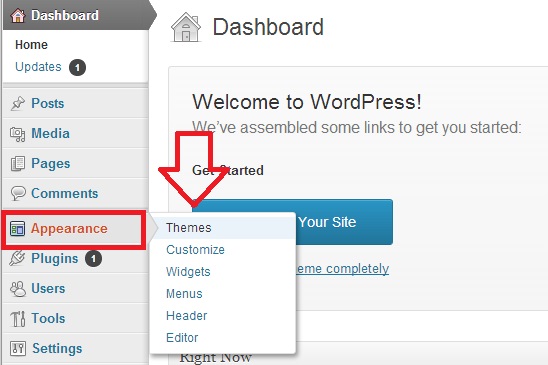
From the Dashboard, select “Appearance” and then “Themes” from the bar on the left. This will take you to the area that will hold themes that you’ve previously installed or that came installed with WordPress. One of the wonderful things about WordPress is the vast availability of free themes for you to use for your site.
WordPress themes are sorted by a number of things including color, layout and their ability to be customized with things like widgets, menus, sidebars and different backgrounds or headers. One of the versatile things about WordPress is that you won’t lose your pages and posts when you change themes and you can preview how a certain theme will look before you take the plunge on applying it. So once you have your page content established, you can change themes around to find what suits you best without having to rewrite it.
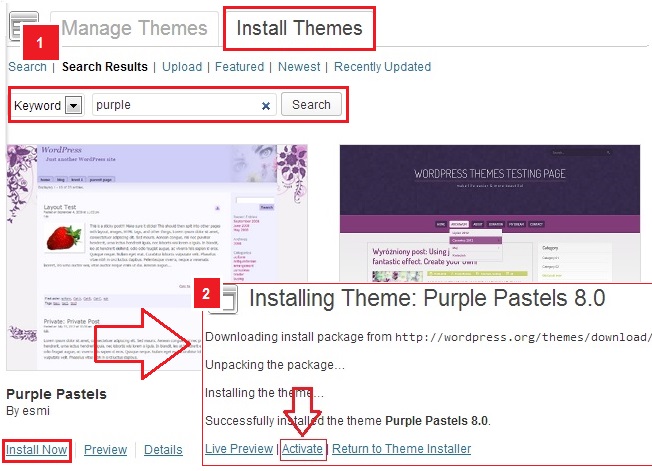
So let’s find a theme! At the top of the page, click on “Install Themes” and search for a purple theme, or search for anything you’re looking for like a business theme, a theme with a slider, a modern-looking theme; the possibilities are endless! Once you’ve found one you like, select “Install Now” on the theme and then “Activate” on the next page to make the theme active on your site.
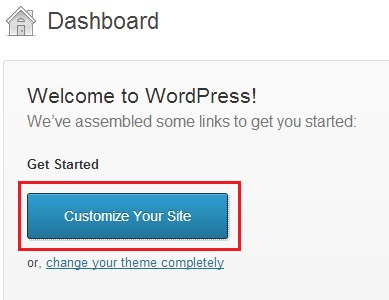
You will next want to customize your site from your main Dashboard with your website name, a tagline and what you would like to display on your front page (your options are recent posts which is good if you’re developing a blog or a static page which is good for static (unchanging) content.
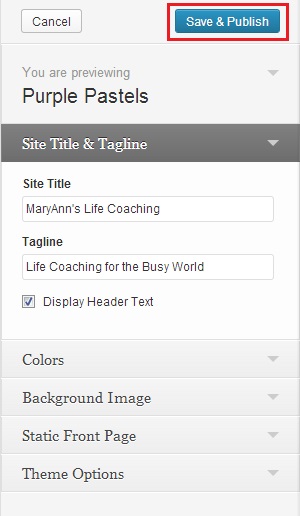
The site title and tagline are what will show up at the top of every page on your site and will appear in search engines like Google once you’ve been indexed, so grammar and spelling count here!
Colors will allow you to select the main colors of your site in this theme while Background Image allows some further customization.
Theme Options vary from theme to theme, but will generally give you options to show or hide things specific to the theme or set up special features like sliding image bars if your theme came with one.
As you click through the options in the bar on the left, you’ll see your changes in the preview window to the right so you can decided if you like it or not. When everything looks great, select “Save & Publish”.
5. Add content
Content is broken up into two categories: pages and posts. Pages are for static content such as a Contact page, an About page or other content that isn’t meant to be displayed chronologically and should remain approximately the same day-to-day. Posts are for blog-style entries and are usually displayed newest to oldest. For non-blog sites, posts do not have to be used. Depending on which you need to add, either can be found in the same Dashboard menu that ‘Appearance’ was found in on the far left.
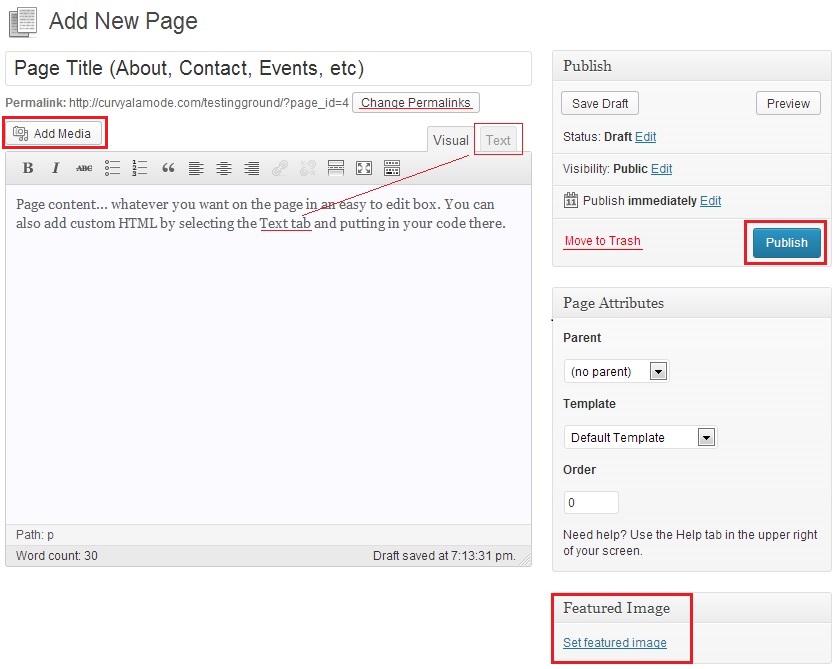
The first step in creating a page is to give it a title. The title will become the link you can give someone so they can find a specific page more easily (like LifeCoachingByMaryAnn.com/about) if you’ve set up your site to do this (please see WordPress’ article on using permalinks for information on your options and how to enable it). The most important pages to have on a business webpage are a Home page, which is sometimes automatically created by your theme (you may need to set your theme to have a static front page or display a specific page you’ve created), an About page to let people know about you and your business and a Contact page so they can get in touch with you. They don’t have to be anything fancy necessarily, though you will want to make sure that your text is easily readable and may want to add a few images through “Add Media”.
Once you’ve created a few pages, go take a look at your website and see what it looks like! It’s the beginning of something beautiful!
This guide is meant to provide an extremely basic overview of getting to know WordPress, and there are many other resources available on the web. Because of the prevalence of WordPress on the web, YouTube and Google have all kinds of tutorials available if you search for them. Some other good places to start are with WordPress’ guide called “Where to Start” or their more comprehensive collection of articles under “Getting Started with WordPress.”
For additional information not covered here, please check out WordPress’ help section.
We make every attempt to ensure the accuracy of this information. If for any reason the information in this article in not correct, please contact OurSuccessCenter@swiha.edu with the article link and the information that needs to be updated.